McKees Rocks
(412) 771-1055
Pittsburgh
(412) 458-3445
Allison Park
(412) 487-2787
Bethel Park
(412) 835-2626
Atlasburg
(724) 947-9999

BACK PAIN: DEGENERATIVE DISC DISEASE AND DEGENERATIVE JOINT DISEASE

Back pain can make it hard to live your life. When your back hurts, bending, moving, or even just sitting can be painful.

If you’ve got back pain, you’re not alone. An estimated 80 percent of Americans will experience a back problem in their lifetime, according to the American Chiropractic Association. There are many causes of back pain, two of which are Degenerative Disc Disease and Degenerative Joint Disease. These two conditions are similar, but there are several slight differences. Here’s what you need to know about these painful conditions, and how you can start feeling better if you’re experiencing them.


What is Degenerative Disc Disease?

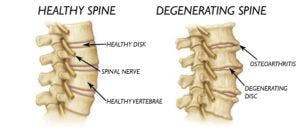
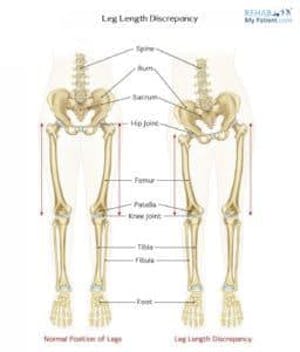
Degenerative Disc Disease (DDD) is actually not a disease. It’s a condition that affects the discs of your spine. Your spine is made up of 33 small bones called vertebrae. In between those bones are your intervertebral discs–a kind of cushion for your vertebrae made up of fibrocartilage tissue. Over time, your intervertebral discs begin to break down. Some intervertebral disc breakdown is normal due to aging. Disc breakdown can also be caused by injuries or stress on the spine. Degenerative Disc Disease occurs when your discs break down so much that it becomes painful to complete everyday tasks.

Back pain is the main symptom of DDD. This pain usually comes and goes depending on your activity level. The pain increases when you stand, walk, or lift anything. Weakness in the legs and back is another symptom of Degenerative Disc Disease.

What is Degenerative Joint Disease?

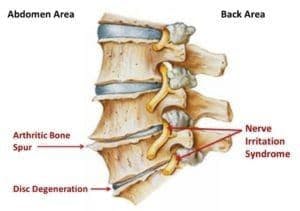
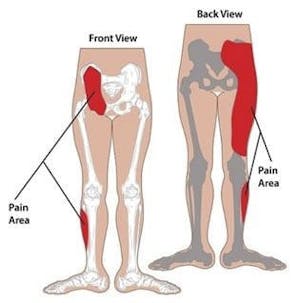
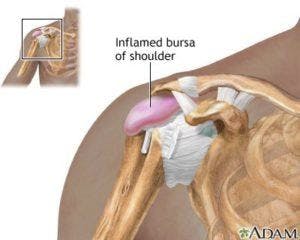
Degenerative Joint Disease (DJD) is another term for osteoarthritis–the wearing down of cartilage at the ends of your bones. This can cause your bones to rub together painfully. Osteoarthritis is the most common form of arthritis, affecting more than 30 million people in the United States. Osteoarthritis can affect joints in any part of your body, but it most commonly causes knee pain, hip pain, hand pain, and pain in the spine.

Risk factors for Degenerative Joint Disease include age and family history. Women are more likely to get DJD than men. People who are obese are also at increased risk for the condition due to the stress that extra weight puts on their joints. Symptoms of Degenerative Joint Disease include pain, stiffness in the joints, and bone spurs. DJD also often leads to poor posture.

The Differences Between DDD and DJD

The main difference between Degenerative Disc Disease and Degenerative Joint Disease is that the conditions occur in slightly different parts of the spine. DDD affects discs directly, while DJD affects the cartilage at the ends of your vertebrae. Since DJD affects other parts of the body aside from the spine, if you are also experiencing pain in other joint areas, it could be indicative of DJD. However, the two conditions can often occur together. Fortunately, both conditions can be treated in the same way.

How Can You Treat DDD and DJD?

  • Pain relievers. Taking an over-the-counter pain reliever such as ibuprofen, aspirin, or naproxen sodium can often help to alleviate your back pain. If your pain is severe, your doctor may prescribe stronger pain relief.
  • Supplements. Many people with Degenerative Disc Disease and Osteoarthritis take glucosamine and chondroitin–components of cartilage. However, research has shown little effect from these supplements. Recent clinical trials have shown some success with avocado and soybean oil supplements. Talk to your doctor before beginning any supplement.
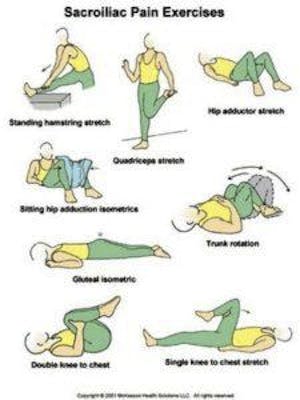
  • Physical therapy. Patients with DDD and DJD can greatly benefit from physical therapy. Your physical therapist will design an individualized course of treatment. Physical therapy helps strengthen your back muscles, making movement less painful.
  • Surgery. In some severe cases, surgery is considered for DDD and DJD. Surgery is only considered for patients who don’t see an improvement in their condition within three months of using more conservative methods.

If you’re experiencing back pain, Hess Physical Therapy can help! Give us a call at any of our 3 locations or refer to our website www.HessPT.com for further contact information. We can design a physical therapy plan to alleviate your pain, whether it’s caused by Degenerative Disc Disease or Degenerative Joint Disease.

Our locations:

  • Kennedy: (412)-771-1055
  • Crafton: (412)-458-3445
  • Allison Park: (412)-487-2787
  • Bethel Park: (412) 835-2626
  • Atlasburg: (724) 947-9999

Website: www.hesspt.com

Disclaimer: this information is "not medical advice" and is used at the site visitor's own risk.

BACK PAIN: AVOID STRAINING BACK MUSCLES THROUGH PROPER LIFTING TECHNIQUES

Many people take back health for granted until they have an episode of some form which results in strained back muscles. Only after they have spent a few miserable days trying to find a comfortable way to sit, stand and walk do they begin to appreciate how much their back muscles factor into even basic body movements. Of course, it is possible to sprain back muscles in a variety of ways including a sports injury or a fall, however, in this article, we will focus on one of the more preventable ways to avoid straining back muscles, which is to learn proper lifting techniques. With consistent use of these techniques, the average individual will greatly increase their chances of avoiding a debilitating back pain episode.

Who is Vulnerable?

Young people who are very physically fit are typically able to do very physical work such as moving furniture into a dorm room or taking a summer job working in lawn care or furniture delivery. Although a young, physically fit person is not entirely immune from incurring a back injury, those most likely to develop weak back muscles are older and much more sedentary. Over time, a sedentary lifestyle leads to weakened muscles throughout the body. Weakened muscles lead to poor posture habits, which further degrades key back muscles involved in lifting such as the paraspinal, along with the glutes (buttock muscles) and transverse abdominis muscles.

The classic scenario of a back injury involves someone who spends their entire week working at a desk job and then decides to take on a weekend warrior project such as yard work, cleaning out the garage or basement, or helping an older child move into their dorm room or first apartment. In most cases of injury, the episode produces temporary muscle spasms or a sprain, however, it is possible to incur more serious damage such as a herniated disc from engaging in improper lifting.

Lifting The Right Way

It’s always a good idea to make it a habit to use proper lifting techniques. The young and healthy can benefit from learning proper lifting techniques since even they can come across a formidable lifting situation on occasion. Learning proper lifting techniques is especially important for anyone who knows they have a “bad back” or if they lead a sedentary lifestyle.

The first step in lifting the right way is to check to see how heavy an item is before even attempting a move. If the item is very heavy, use the buddy system. It may take an additional person or two to move a very heavy item and that’s ok. For those who know they have a vulnerable back, it’s always a good idea to wear a lifting belt. Even if a person feels fairly confident about their lifting ability, it’s still a good idea to wear a belt if they know the task will involve multiple lifts.

Correct posture to lift a heavy object, Man lifting object. The actual lifting process involves not just the glutes, paraspinal and abdominal muscles, it also involves the muscles in the front and back of the thighs (quads and hamstrings), along with the biceps in the arm, and muscles in the forearms and hands. The most important step in proper lifting is to bend the knees and lift from a squatting position. Never lock the knees and try to pick something up by bending over from a standing position.

From a squatting position as close as possible to the object, grasp the object with both hands, bringing it close to the body. Maintain good posture by keeping the back perpendicular to the ground. Use the motion of straightening the legs to actually lift the object, while also tucking the stomach inward, activating those transverse abdominis muscles that are so important in core stabilization required for proper lifting.

If you would like to know more about how to avoid a back injury from lifting, please contact us at any of our of 5 offices or refer to our website www.HessPT.com for further contact info.

Our locations:

  • Kennedy: (412)-771-1055
  • Crafton: (412)-458-3445
  • Allison Park: (412)-487-2787
  • Bethel Park: (412) 835-2626
  • Atlasburg: (724) 947-9999

Website: www.hesspt.com

Disclaimer: this information is "not medical advice" and is used at the site visitor's own risk.

BACK PAIN AND DIFFERENT LEG LENGTHS

It’s not uncommon for people to assume the human body is perfectly symmetrical, however that is not always the case. Typically, minor differences such as one ear placed a bit lower than the other, or middle fingers that are slightly different in length do not cause any health issues. However, even minor discrepancies in leg length can cause physical challenges since a person’s legs are the extremities that bear the brunt of impact during physical movement. If you are having unexplained hip, leg, or back pain, it could be stemming from a difference in leg length.

Back, Hip and Leg Anatomy

The impact of a single step involves multiple body parts — starting at the foot, traveling all the way up each leg, radiating throughout the hip area, even affecting the lower spinal area where both hips attach to the spinal column. If one leg is shorter than the other, undue pressure is placed on some of these areas, whereas other areas may weaken over time from lack of normal use. Specifically, discrepancies in leg length can cause issues with bones such as the lumbar (lower back) vertebrae, the sacrum located at the base of the spine, in addition to the pelvic innominates (hip bones). Key muscles throughout the lower back, hip, and leg area may become over or under-used. Some of the affected muscles include the pelvic floor muscles, leg muscles such as the quads and hamstrings, along with core/hip muscles such as the abdominals, obliques, paraspinals, and deep and superficial hip muscles.

Who is Vulnerable?

Some people are born with a congenital malformation where a discrepancy in leg length is noticeable at birth. Others may be born with a difference in length not necessarily significant enough to be noticeable to the naked eye, but enough to cause issues later in life, especially during the aging process. Some people may notice a difference in leg length after surgery, such as a hip replacement, or a repair from a leg fracture or broken bone. Some people may have a primary health issue in and around the back, hip or leg area, causing them to hold their body in such a way that the muscles on one side of their body tighten to the point where it causes a physical difference in leg length.

Symptoms

Individuals with different leg lengths may experience a host of physical aches and pains throughout the hip and leg area. Some people may have one leg that always seems to have tight muscles, especially the hamstrings. A person may also experience groin pain, buttock pain, SI (sacroiliac) joint pain, and/or lower back pain. Sometimes a person will feel lop-sided as they attempt to walk or perform some other physical movement. Often a person with a discrepancy in leg length will notice greater difficulty with transitional movements such as going from sitting to a standing position.

Physical Therapy Solutions

Professional physical therapy sessions can do quite a bit for patients experiencing seemingly unexplained leg, hip, or back pain. First, they can evaluate a patient’s legs to determine if length differences could be a significant contributing factor to their pain level. If a patient has an underlying issue that causes them to overuse one of their legs, a physical therapist can address the underlying issue, thus freeing the affected leg from excessive use. After identifying the root cause of any length discrepancy, a professional physical therapist can help improve stability and alignment by creating a series of exercises designed to stretch and strengthen key muscles. A physical therapist may also be able to recommend orthotic devices such as shoe inserts or specially-made shoes that will help minimize any difference in a patient’s lower extremities.

If you would like to know more about how physical therapy can help with back, hip, and leg issues, please contact Hess Physical Therapy at any of our 5 convenient locations or refer to our website www.HessPT.com for further contact info.

Our locations:

  • Kennedy: (412)-771-1055
  • Crafton: (412)-458-3445
  • Allison Park: (412)-487-2787
  • Bethel Park: (412) 835-2626
  • Atlasburg: (724) 947-9999

Website: www.hesspt.com

Disclaimer: this information is "not medical advice" and is used at the site visitor's own risk.

WHY IS MY SHOULDER PAIN WORSE AT NIGHT?

Most people are able to engage in various positions while sleeping without much thought. However, sometimes people experience shoulder pain at night that for the most part, disappears during the day. This may be an indication they are beginning to experience some type of issue within the shoulder region. Anyone experiencing persistent shoulder pain while sleeping should seek medical attention in order to determine the exact cause of their pain.

Anatomy of the Shoulder

The shoulder joint is a ball and socket joint, where the rounded edge of the humerus (upper arm bone) fits within a shallow depression (glenoid fossa) located on the scapula, otherwise known as the shoulder blade.  The rotator cuff is a series of muscles and tendons that surround and support this area, as well as allowing movement of the arm and shoulder. The tendons of the rotator cuff are surrounded by a series of small sacs called bursa. These fluid-filled sacs provide protection and cushioning around the shoulder tendons. Sometimes these sacs or the rotator cuff tendons become inflamed and painful. In some cases, a tear occurs in a muscle or tendon that is part of the rotator cuff, and this is known as a rotator cuff tear.

Shoulder Injuries and Sleeping

People with underlying shoulder issues such as tendonitis, bursitis, or a rotator cuff tear will likely find it much more challenging to find a comfortable sleeping position, especially if they prefer to sleep on their affected shoulder.  Sleeping for hours on an injured shoulder compresses inflamed tissues, causing pain from the undue pressure. Depending upon the nature and severity of the issue, individuals may experience stiffness upon waking in the morning, a dull achy pain, numbness and/or tingling throughout the shoulder and arm area, or perhaps sharp pains radiating from the shoulder. In the initial stages of the injury, an individual may experience only pain at night which disappears during the day, leading them to believe their pain is caused by a poor-fitting pillow or mattress.  As the injury advances, some patients will start to feel shoulder pain even though they stopped sleeping on the affected shoulder.

A Diagnosis

The first step to resolve persistent shoulder pain at night is to obtain a proper diagnosis. In most cases, a physician will not suggest surgery. Instead, they will likely prescribe physical therapy as part of their first line of treatment. Depending upon the nature of the injury, a physical therapist will likely begin with pain-reducing measures such as ultrasound and gentle stretching exercises, along with suggestions on which movements and positions to avoid, both during the day and while sleeping in order to reduce pain.

Initially, many patients will find simply sleeping on their opposite side or on their back during the recovery period will completely eliminate or reduce their pain during sleep. Depending upon the injury and the level of severity, a physical therapist may suggest the patient place a towel or a thin to medium-sized pillow underneath their affected arm and shoulder arm in order to provide cushioning and support. During the day, a patient may wear a lightweight sling over each shoulder to help promote proper posture while walking and moving about, as practicing good posture helps relieve pressure on tissues so they can heal faster.

As a patient’s injury improves, a physical therapist will introduce exercises designed to restore full range of motion, followed by strengthening exercises to improve muscle strength so the shoulder joint and surrounding tissues can once again perform their tasks of motion and support. Once the patient heals and their shoulder strength returns, they will likely find their ability to sleep on their side fully restored.

Summary

If you have persistent shoulder pain while sleeping, it could be an indication of an underlying health issue. For more information, contact Hess Physical Therapy at any of our 5 locations.

Our locations:

  • Kennedy: (412)-771-1055
  • Crafton: (412)-458-3445
  • Allison Park: (412)-487-2787
  • Bethel Park: (412) 835-2626
  • Atlasburg: (724) 947-9999

Website: www.hesspt.com

Disclaimer: this information is "not medical advice" and is used at the site visitor's own risk.

IS YOUR ELBOW PAIN CAUSED BY GOLFER’S ELBOW?

If you are experiencing pain where the tendons of your forearm attach to the bony bump on the inside of your elbow, you may have a condition known as golfer’s elbow. Even if you don’t play golf, this injury happens to many people over time.

What is golfer’s elbow?

Let’s start by understanding the anatomy of the elbow. The elbow is a joint. It contains three arm bones, the humerus, ulna, and radius. The ends of these bones are covered with cartilage, which allows the joints to absorb shock. The bones are held together by ligaments which form the joint capsule. The joint capsule surrounds and lubricates the joint. There is a ligament on the inside of the elbow and another on the outside of the elbow. These, together with a third ligament holding the radial head against the ulna, keep the elbow stable. The nerves in your arms pass across the elbow. They transmit sensations and tell your muscles to work.

Golfer’s elbow is usually experienced as pain in the medial, or inside, of your elbow. The pain may spread into your forearm and wrist. Your pain may grow worse during forceful arm motions, gripping and lifting.

Why does golfer’s elbow occur?

The method of injury, (MOI)  is usually chronic overuse, such as repeatedly twisting the forearm when making throwing or swinging motions. These motions may apply too much force to the area. Sometimes improper technique or equipment used in a sport can contribute to the condition.

How is golfer’s elbow diagnosed?

Diagnosis usually begins with a medical history and physical examination. A doctor may order an X-ray to rule out other possible causes of elbow pain.

Your medical professional may perform a medial epicondylitis test. During this procedure, your doctor or therapist supports the elbow with one hand, extends the elbow, wrist, and fingers and palpates the affected region. If this produces pain or discomfort, the test is considered positive. The doctor may also perform various strength, range of motion and functional mobility tests on your elbow, forearm, and wrist.

What if you are not a golfer?

In addition to golf, many activities can lead to golfer’s elbow. Sports such as racket sports, throwing sports, and weight training can all cause golfer’s elbow.  Repetitive tasks like gardening, shoveling, throwing a ball, painting and similar activities all put you at risk for golfer’s elbow. Occupations that require forceful, repetitive movements, such as construction, plumbing, and carpentry, can lead to golfer’s elbow. Other risk factors include smoking and obesity.

Physical therapy

Assessments performed by your physical therapist may be used for differential diagnosis, which helps identify other possible conditions or diseases that could be causing your symptoms. Once your physical therapist has evaluated your condition, he or she will work with you to develop a plan of care. This may include various treatments, such as:

  • Ice
  • Heat
  • Kinesiology taping for your elbow
  • Elbow bracing or support sleeves
  • Ultrasound
  • Electrical stimulation

Your physical therapist may prescribe some exercises designed to restore strength to your elbow and wrist, and increase your range of motion. These exercises may include:

  • Exercises to increase your elbow joint mobilization
  • Exercises to improve the strength and stability of your shoulder area
  • Wrist flexor and extensor stretches
  • Exercises to strengthen your wrist and elbow

Physical therapy may include Instrument Assisted Soft Tissue Mobilization (IASTM), which may help loosen tight muscles and increase your range of motion. Also, you can learn how to modify your activities to prevent future problems.

What is the difference between golfer’s elbow and tennis elbow?

Both golfer’s elbow and tennis elbow are forms of elbow tendinitis. The difference is simply that golfer’s elbow is caused by damage to tendons on the inside of the elbow, while tennis elbow is a function of tendons on the outside of the elbow.

If you have questions or concerns about possible golfer’s elbow, call Hess Physical Therapy or visit our website for further contact information.

Our locations:

  • Kennedy: (412)-771-1055
  • Crafton: (412)-458-3445
  • Allison Park: (412)-487-2787
  • Bethel Park: (412) 835-2626
  • Atlasburg: (724) 947-9999

Website: www.hesspt.com

Disclaimer: this information is "not medical advice" and is used at the site visitor's own risk.

THE BEST HOME EXERCISES FOR A STIFF OR FROZEN SHOULDER

Do you wake up almost every morning with shoulder pain and stiffness? You may be suffering from a frozen shoulder. Also known as adhesive capsulitis, frozen shoulder can restrict movements or even prevent you from using your shoulder. One of the most effective treatments for frozen shoulder is physical therapy. Here are three of the best home exercises for a stiff or frozen shoulder, along with the benefits of physical therapy. 

Anatomy of the Shoulder Ligaments and Shoulder Joint Capsule 

Your shoulder joint is one of your body’s most complex and largest joints. While playing sports, often people injure their shoulder joint capsule, which typically results in shoulder sprains and dislocations. Your shoulder ligaments help in holding the humerus (upper arm bone) in the socket, giving the shoulder joint stability.

The humerus is the long bone in your arm, extending from your shoulder down to your elbow. The band of connective tissue, known as the shoulder joint capsule, houses the head of your humerus.

Common Causes 

Frozen shoulder frequently begins as a result of a minor injury, such as falling on an outstretched arm or jarring a shoulder by tripping. Besides trauma to the arm and shoulder, there are several other causes, which include:

  • Diabetes—While frozen shoulder affects only about two percent of the overall population, it’s found in 10 to 29 percent of diabetics.
  • Another cause is a decrease in mobility as a result of health problems, including stroke, fracture, rotator cuff tear, and surgery.
  • Shoulder bursitis
  • Tendinitis
  • Inflammatory issues
  • Autoimmune disorders and thyroid problems

Best Home Exercises For a Stiff or Frozen Shoulder

  1. Wall Washing/Finger Walk Up Wall
    Wall-washing is one of the top home exercises for frozen shoulder or shoulder arthritis. This is an active movement in which you do the work while your shoulder joint moves. To do the exercise:
    • Find a clear wall, standing from it at arms-length.
    • Then, facing the wall, straighten out the right arm so that it’s lined up with your shoulder.
    • After putting your fingers on the wall, move your fingers up the wall, pretending they’re spider legs. Use only one to two fingers at a time.
    • Reaching as high as you comfortably can, hold the stretch for 10 seconds.
    • Finally, gradually walk down your fingers, repeating the process two more times.
    • Repeat the exercise, using your other arm.
  2. Pendulums Exercise
    The pendulum exercise is done for maintaining shoulder mobility.
    • Bend at your waist with one arm hanging down. For support, hold on to a chair or table.
    • Gently rock your body back and forth, using circular motions for moving your arm in a circular direction.
    • Next, reverse the movement so that your arm goes in the opposite direction.
    • Repeat this exercise five times. 
  3. The Towel Rotation Stretch
    This is another great stretching exercise for treating shoulder joint pain and frozen shoulder.
    • Holding the end of a long towel, belt or strap in one hand, have the towel draped over your shoulder, letting it hang down your back.
    • Use your other hand to grip the towel that’s behind your back.
    • Then, gently pull up the towel, letting your hand that’s behind your back to gradually travel up and across your back. This should result in feeling a gentle stretch on the side or the front of your shoulder.
    • After you’ve felt the stretch, keep the position, holding it for two to three seconds.
    • Then, release the stretch slowly, repeating these steps 10 times.
    • With each stretch, try to pull your arm up your back a little further. Don’t use any jerking or sudden motions, making sure you move slowly.

Considerations and Warnings

  • Frozen shoulder mostly affects middle-aged females from 40 to 60 years of age.
  • You can also do wall-washing exercises in water. In fact, pool water gives you somewhat more resistance since water is considerably denser than air.
  • Consult a medical professional for a diagnosis and then see a highly trained and experienced physical therapist.
  • Warm-up before doing the exercises.

Don’t continue to suffer from shoulder stiffness, frozen shoulder or shoulder arthritis. For more information on how physical therapy can help you, call Hess Physical Therapy or visit our website for further information.

Our locations:

  • Kennedy: (412)-771-1055
  • Crafton: (412)-458-3445
  • Allison Park: (412)-487-2787
  • Bethel Park: (412) 835-2626
  • Atlasburg: (724) 947-9999

Website: www.hesspt.com

Disclaimer: this information is "not medical advice" and is used at the site visitor's own risk.

THE PAINFUL EFFECTS OF SHOULDER BURSITIS

Shoulders. They’re what you use to “shrug”, to throw, to reach, and sometimes even to “carry the weight of the world”! So when something goes wrong with your shoulder joint, you definitely notice a difference in your ability to perform all sorts of everyday movements that you usually don’t even think about.

Understanding Your Shoulder Joint

Your shoulder is a complex ball-and-socket joint that’s capable of flexion (bending), extension, rotation, and more. The fact is, your shoulder is the most mobile joint in your body! It’s surrounded by muscles, tendons, ligaments, bands of tissue like the rotator cuff and the labrum, plus some cushion-like tissue known as the subacromial bursa. A bursa is a thin, lubricated “cushion” that lies between a bone and an opposing surface such as a ligament, muscle or tendon. Its purpose is to reduce friction in a joint — in this case, your shoulder joint.

So What is Bursitis?

In the simplest of terms, bursitis refers to a painful condition that occurs when a bursa becomes inflamed. Since your shoulder’s bursa is the largest bursa in the body, and it is “packed” closely together with the other components that make up your shoulder, it is extremely susceptible to becoming inflamed. (By the way, simply because every part of your shoulder anatomy is so densely packed together, it’s not unusual for bursitis to be mistaken for something else like a rotator cuff tear, a labral tear, or even tendonitis!)

The subacromial bursa provides a cushion and reduces friction between the shoulder’s muscles and tendons and the acromion — the topmost part of your shoulder blade. But even though it’s the largest bursa providing cushioning in your shoulder joint, it’s not the only one. There are several others, including the subdeltoid bursa, the subscapular bursa, the subcoracoid bursa, the coracoclavicular bursa and the supra-acromial bursa. If anyone of these becomes irritated and inflamed, you’ve got shoulder bursitis!

Okay, But What’s Irritating My Shoulder Bursae?

Your shoulders’ bursae can be irritated and become inflamed by a number of different things, including:

  • friction caused by repetitive overhead motions that occur when you’re painting the bathroom ceiling, for example, or maybe you’re a swimmer who’s specialty is the Australian Crawl, a swimming style that involves overhead reaching motions
  • a sudden injury — particularly one where you fall onto an outstretched hand, or just bang your shoulder hard against something
  • an underlying condition such as arthritis or gout
  • being crowded by other parts of your shoulder perhaps due to bone spurs from arthritis, or just because you injured another part of your shoulder and it’s become inflamed or swollen, leaving less space for your bursae

Oh — The Pain! (Symptoms of Shoulder Bursitis)

Pain from shoulder bursitis doesn’t usually come on all at once. Rather, it comes on gradually, as the bursae become more and more irritated and/or inflamed.  The problem with this is that you tend to start “babying” your shoulder to avoid feeling pain, and this can affect the muscles and tendons surrounding the bursae, making them tight, limiting motion, and eventually, causing even more pain. (You know, the old “vicious cycle” syndrome!)

Other symptoms of shoulder bursitis include stiffness and weakness. Warning: If you develop a fever or feel sick, check with your doctor right away because there is a thing known as “Septic Bursitis” which is caused by an infection, and if that’s the case, it needs to be treated right away with antibiotics!

Making a Determination

Diagnosing shoulder bursitis is not all that complicated, and a physical exam combined with questions can often lead your doctor to believe that bursitis is what’s causing your pain and stiffness. However, she can easily confirm that initial diagnosis with an ultrasound or an MRI as well.

Treating Your Shoulder Bursitis

As with most musculoskeletal maladies, treatment for shoulder bursitis typically starts with

  • rest
  • anti-inflammatory medications (NSAIDS)
  • ice therapy

Your doctor may even think it’s a good idea to drain the bursae if they’re really swollen she’s worried about the possibility of infection. And after all of these options have been put into place, the next step is almost always a program of physical therapy.

This is actually a crucial step for both your successful recovery and to prevent a future recurrence of the condition. Your physical therapist (PT) will develop a program that combines manipulation, postural correction, and specific exercises to address problems such as weakness, stiffness, lack of mobility and tightness, and will have you feeling better way sooner than you would if you skipped this step.

If you’re suffering from shoulder bursitis Hess Physical Therapy or shoot us an email at cawleyptfrank@gmail.com. We can not only treat your shoulder bursitis, we can also make sure that it’s not the only thing that’s causing your shoulder pain!

[blog_locations\

THE TOP 10 THERABAND EXERCISES FOR ROTATOR CUFF/SHOULDER INJURIES

Many people assume if they incur a shoulder/rotator cuff injury that it automatically means their injury will require surgery, but that is not necessarily the case.  In many cases, other non-surgical treatments like physical therapy can help patients avoid surgery by using specific stretching and strengthening exercises.  When administered by a physical therapist, these exercises can stretch tight muscles, help promote the proper range of motion in the arm and shoulder area, along with gradually strengthening muscles surrounding the shoulder area so that all of the shoulder components maintain their health and ability to perform certain tasks.

Rotator Cuff Definition and Injuries

Surrounding the shoulder joint is a group of tendons and muscles.  This group is called the rotator cuff and they provide the support necessary to keep the top of the arm bone firmly in the socket area of each shoulder.

There are several reasons why the rotator cuff area may become injured.  Beyond traumatic injuries such as vehicle accidents and sports injuries, the most common causes of rotator cuff injuries stems from individuals who routinely perform physical tasks that require them to keep their arm(s) lifted.  Painters, carpenters, and others in the construction industry often end up with rotator cuff injuries due to the nature of the work.  Age is another factor that plays into developing rotator cuff injuries, most likely due to a sedentary lifestyle that weakens muscles over time.

Sometimes simple inflammation will occur in the shoulder, but in other cases, an actual tear occurs in a muscle.  Whether or not surgery is required, depends upon the severity of the tear.  Anyone with a rotator cuff injury should receive an accurate diagnosis from their physician.  In many cases, the doctor will prescribe a series of physical therapy treatments, which will allow the individual can regain the full use of their shoulder.


10 Theraband Exercises for the Rotator Cuff

  1. External rotation @ 0 degrees of abduction – This exercise requires the patient to hold the Theraband at waist height with the hand of their injured arm, forearm across their waist.  The next step is to rotate the forearm 90 degrees so the hand is pointing outward, then return the forearm back to its neutral position.  This strengthens the muscles attached to the shoulder blade including the infraspinatus, teres minor, and the supraspinatus.
  2. Internal Rotation @ 0 degrees of abduction – Once again the patient will hold the band at waist level, only this time the starting position is with the hand in front at a 90-degree angle to the body.  Rotate the arm inward until the forearm is resting at the waist, then slowly return the forearm to 90 degrees.  This strengthens the internal rotator cuff muscles including the iliac crest and the latissimus dorsi.
  3. External rotation @ 90 degrees abduction – To start, lift the affected arm to the side until the elbow reaches shoulder height.  Extend the hand forward to grasp the band placed at about shoulder height and lift it up until the hand is pointing to the ceiling.  Then come slowly come back to starting position.  Do not rotate the hand at all throughout the motion.  This is another exercise to strengthen the infraspinatus and teres minor.
  4. Internal rotation @ 90 deg abduction – In this exercise, the patient will actually stand with the band behind them.  Place the resistance band handle in the hand, with the hand pointed to the ceiling.  The elbow should be at shoulder height.  Move the hand forward until it is facing forward, then slowly lift it back up until it is facing the ceiling again.  This will strengthen the pectoralis major, the deltoid in the arm and the rotator cuff.
  5. PNF D2 Flexion Pattern –  In this exercise, the band is positioned at hip height on the opposite side of the affected arm.  Cross the affected arm over the body and grasp the resistance band.  Slowly bring it across the body and lift the arm up in the air at a diagonal.  This exercise strengthens the posterior (back) of the shoulder and the deltoid in the arm.
  6. PNF D2 Extension Pattern –  Similar to the D2 flexion pattern, this exercise begins with the Theraband positioned high enough so the patient can grasp the band handle while their affected arm is fully extended upward.  The next step is to slowly bring the handle down and across the body, then return to starting position.  This exercise focuses on the muscles on the posterior side of the shoulder.
  7. Rows with elbows flexed to 90 degrees – With the Theraband positioned at waist height, stand far enough back from the band to start with the arms fully extended.  Grasp the handles and pull until the elbow are just slightly behind the waist, then return slowly to starting position.  The muscles strengthened in this exercise are the rhomboids and middle trapezius.
  8. Shoulder extension with elbows @ 0 degrees – Face the band positioned at a height where the arm can be fully extended.  Without bending the elbow, slowly pull down the arm until the hand is resting comfortably by the side of the body, then return the arm to the starting position.  The deltoid, latissimus dorsi, and middle trapezius are the muscles strengthened in this exercise.
  9. Punch out exercise for serratus anterior strengthening – Place the resistance band around the mid-back area and grasp the band on each side.  In a slow punching motion, bring the band forward as far as one can reach, then slowly come back to starting position.  This exercise helps to stabilize the scapula area by strengthening the serratus anterior muscle.
  10. Shoulder scaption –  Stand on the resistance band on the affected side.  Grasp the band and pull it up and slightly forward, then slowly return to starting position.  This exercise strengthens the supraspinatus and deltoid muscles, along with the rotator cuff area.
  11.  

Want to know more about physical therapy for rotator cuff and other shoulder injuries or need a piece of Theraband?  Stop at Hess Physical Therapy and schedule an evaluation with one of our doctors today!

Our locations:

  • Kennedy: (412)-771-1055
  • Crafton: (412)-458-3445
  • Allison Park: (412)-487-2787
  • Bethel Park: (412) 835-2626
  • Atlasburg: (724) 947-9999

Website: www.hesspt.com

Disclaimer: this information is "not medical advice" and is used at the site visitor's own risk.

5 tips to simplify your life with knee pain

In our last newsletter, we showed you why regular movement is key to overcoming knee pain and presented some of the best knee-strengthening exercises that will help you work towards this goal. These types of exercises can be extremely effective for anyone dealing with knee pain, but in some cases, additional strategies are needed just to help individuals stay mobile and navigate their surroundings.

Patients with severe knee pain and those who are recovering from surgeries like ACL reconstruction or knee joint replacement may be impaired to a point where basic activities become extremely difficult. These tasks can be even more challenging for older adults with balance issues who have to contend with several limitations to their mobility. Assistive devices like canes, crutches, and walkers may therefore be recommended in these situations to compensate for any limitations these patients may be dealing with.

There are right and wrong ways to use assistive devices, and using them correctly will result in less pain and a reduced risk for future injury. With this in mind, we offer these tips to help you better handle your knee pain:

5 pieces of advice for knee pain

  1. Up with the good…
    • It’s important to walk up and down stairs in a particular way if you have severe knee pain
    • When going up stairs, step with the good (non-injured) leg first while holding onto the railing
    • Once that foot is on the stair, step up with the bad (injured) leg
    • This allows the non-injured leg to do most of the work to push the body up the stair while leaving minimal work for the injured leg
  2. …down with the bad
    • When coming down stairs, step with the bad leg first while holding onto the railing
    • Once that foot is on the stair, step down with the good leg
    • This is done because the back (good) leg is the one doing most of the work when walking down stairs
  3. Make sure your chair is at the right height
    • Sitting in a chair that is too high or too low can put your legs in a compromised position and make your knee pain worse
    • In a sitting position, your feet should be flat on the floor or a footrest and your knees should be at or slightly below the level of your hips
    • Your knees should be bent at an angle of 90-130 degrees
    • If your chair height does not allow you to sit in this position, switch to a chair that does or adjust the height of your chair if possible
  4. Use the correct hand to hold your cane
    • Many patients do not hold their cane in the correct hand, which can lead to unnecessary strain on their injured knee
    • The cane should always be held in the hand opposite of the painful side
      • This means if you had surgery on your left knee, hold your cane in the right hand and advance it forward when the left leg steps forward
    • This also applies to stairs, as you should walk up with the cane and the good leg, and down with the cane and the bad leg
  5. Properly align your body with your walker
    • If you are using a front wheel walker, be sure to keep the front of your body in line with the back two posts of the walker
    • Advance the walker a few inches in front of you first, and make sure all tips and wheels are touching the ground before taking a step
    • Step forward with your bad leg first, then step forward with your good leg, placing it in front of your lead foot

It’s imperative that these tasks are performed correctly to help you avoid further knee pain or injury, and a physical therapist can provide the additional guidance needed to give you confidence that you’re doing them the right way. Contact us today to learn more and schedule an appointment.

Disclaimer - This article and associated images is for educational purposes only. They are not meant to be a substitute for physical therapy or medical care. Please consult with your physical therapist and/or doctor before you start this or any other exercise program.

Our locations:

  • Kennedy: (412)-771-1055
  • Crafton: (412)-458-3445
  • Allison Park: (412)-487-2787
  • Bethel Park: (412) 835-2626
  • Atlasburg: (724) 947-9999

Website: www.hesspt.com

Disclaimer: this information is "not medical advice" and is used at the site visitor's own risk.

The 5 Natural Ways to Relieve Sciatica

Have you ever experienced aching pain in the back / buttock area that radiates down your leg? You may have sciatica. Sciatica is a common condition that affects up to 1 out of 10 people, typically between ages 25-45.

Symptoms

Sciatica is typically felt as a dull aching pain to the low back / buttock area, that can at times be sharp, depending upon movement. It is generally on one side, but at times can be on both sides. Other symptoms can include numbness and / or tingling, radiating down to certain areas of the leg.

Causes

Sciatica is an entrapment and irritation to the sciatica nerve, which passes from the lower spine, down through the buttock and supplies the back of the leg down to the foot. Typically, sciatica is caused by poor mechanical movement of the hips, pelvis or lower back. This causes abnormal strain and stress to the gluteus and hip rotator muscles. Certain people are more predisposed to sciatica, because their sciatica nerve pierces through the piriformis muscle in the buttock, which makes it more susceptible to irritation.

Pain Relief

The good news is that over 90% of those suffering with sciatica will get better with conservative treatment, especially physical therapy. Physical therapy focuses on improving the mechanical movement of the hip joints, pelvis and spinal joints to relieve pressure on the sciatica nerve. Furthermore, since many muscles are impacted and often weakened, physical therapy helps to restore normal muscle function. This balances the spinal, gluteal and leg muscles.

Try these 5 natural ways to relieve your sciatica:

  • Improve your posture – One of the long-term causes of sciatica is poor posture. Make sure that you have a lumbar support in your work chair and in your car that you can take with you to different places. Look at the way your computer and desk area is setup. Avoid soft couches and recliners. Physical therapists are experts in ergonomics and can teach you the proper posture setup for workstations and home activities.
  • Change your position frequently – Sitting puts direct pressure on the sciatic nerve. Therefore, it is important to change positions frequently. Consider getting an adjustable standing desk if you have to spend most of your day sitting at a computer. If you are suffering from sciatica, try lying down for 10 minutes, standing for 10 minutes and sitting for 10 minutes. Rotate this throughout the day as much as you can.
  • Try magnesium – magnesium is thought to sooth irritated nerves and many of us have magnesium deficiencies. Try a good magnesium and calcium supplement to soothe pain. However, if you are on medications, consult your physician first.
  • Improve your hip strength and flexibility – The gluteal muscles support the normal walking motions we perform everyday. They become weak and tight with prolonged sitting, especially at a desk job. This causes severe strain on the smaller hip muscles around the sciatic nerve, when walking or standing.
  • Get your body mechanics checked – Most of us do not realize that we have made an adaptation in our normal movements, because of limited joint motion or muscle weakness. Our body is amazing at adapting to problems, however, it can only do this for so long, until abnormal strain and stress occurs. Having a thorough biomechanical movement analysis by one of our trained physical therapists, will pinpoint the exact problem that is causing your sciatica. This allows us to formulate a treatment plan that will help you naturally restore your movement, function and quickly relieve your pain.

Our locations:

  • Kennedy: (412)-771-1055
  • Crafton: (412)-458-3445
  • Allison Park: (412)-487-2787
  • Bethel Park: (412) 835-2626
  • Atlasburg: (724) 947-9999

Website: www.hesspt.com

Disclaimer: this information is "not medical advice" and is used at the site visitor's own risk.